
how to edit roblox studio record settings
Roblox Studio has become a popular platform for aspiring game developers and content creators alike. With its rich features and extensive customization options, users can create immersive experiences and capture them for sharing with the world. However, many new users may find themselves overwhelmed when it comes to editing the recording settings for their projects. Understanding how to tweak these settings can significantly enhance both the quality of your recordings and your overall experience. In this article, we’ll explore how to edit Roblox Studio's record settings and provide tips for optimizing your recording experience.
A Step-by-Step Guide to Editing Roblox Studio Record Settings
Editing the record settings in Roblox Studio is essential for tailoring your game footage to meet your needs. To begin, launch Roblox Studio and open your desired project. Once the project is loaded, navigate to the "View" tab located at the top of the interface. Here, you should find a variety of options, including the "Explorer" and "Properties" sections. Ensure that the "Output" panel is also open, as it can provide valuable feedback during your recording session.
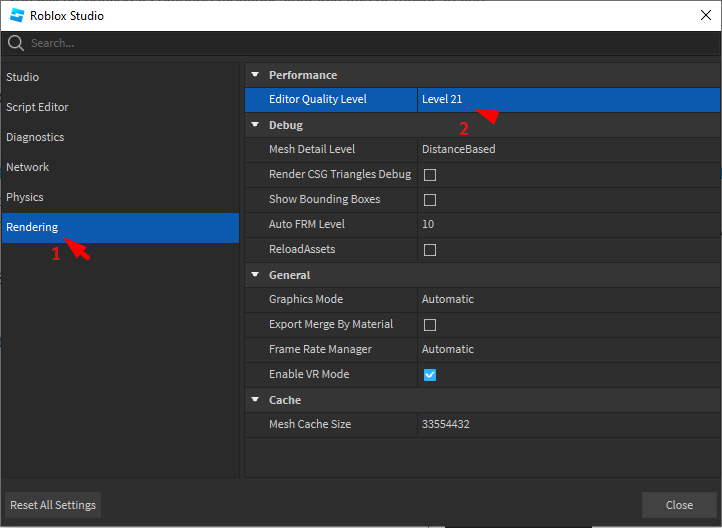
Next, access the "Settings" by clicking on the gear icon typically found in the corner of the screen. This will open a new menu where you can adjust the recording settings to suit your preferences. Look for options that allow you to select the resolution, frame rate, and audio quality. Setting a higher resolution and frame rate will result in better visual quality, while adjusting the audio settings will ensure that any in-game sounds are captured clearly. Don’t forget to save your settings before exiting the menu.
Finally, it’s a good practice to run a test recording to see how your settings perform in action. Start the recording by clicking the "Record" button, and then play through a portion of your game. Once you’ve completed the test, stop the recording and watch the playback. This will give you a clear idea of whether your settings need further adjustments or if you’re ready to produce high-quality recordings. Remember, experimentation is key to finding the perfect balance for your projects.
Tips for Optimizing Your Roblox Studio Recording Experience
Optimizing your recording settings can greatly enhance the quality of your projects. One of the most important aspects is to ensure your computer's performance capabilities are sufficient for high-quality recording. Check your system specifications and close any unnecessary background applications that could consume valuable resources. This will help ensure that Roblox Studio runs smoothly, providing a seamless recording experience without lag or interruptions.
Another essential tip is to utilize the built-in filtering and effects options within Roblox Studio. Experimenting with lighting, camera angles, and character animations can create dynamic footage that captivates your audience. In addition, use the "TweenService" for smoother animations and transitions, as this can add a professional touch to your recordings. Keep in mind that the more engaging your footage, the more likely it is to resonate with viewers.
Lastly, consider your editing software for post-recording enhancements. After you have captured your footage, importing it into video editing software can allow you to make additional adjustments, such as color correction, sound editing, or adding overlays. The combination of a well-recorded game and thoughtful post-production can elevate your content and attract a broader audience. Don’t hesitate to explore various editing tools to find what works best for your style and needs.
Editing your Roblox Studio record settings is a fundamental step for anyone looking to create compelling game footage. By understanding how to navigate the settings menu and applying optimization techniques, you can significantly improve the quality of your recordings. With practice and creativity, your captured gameplay can become a powerful tool for sharing your unique vision with the Roblox community and beyond. Happy recording!
Leave a Reply