
how to record audio in fl studio
Recording audio in FL Studio can seem daunting for beginners, but once you understand the basics, you'll find it's a straightforward process that opens up a world of creative possibilities. Whether you're a musician laying down vocals, a podcaster creating episodes, or a sound designer capturing unique sounds, FL Studio provides powerful tools to achieve high-quality recordings. In this article, we’ll guide you through the necessary steps to set up your audio recording environment and provide a comprehensive step-by-step guide to recording audio tracks in FL Studio.
Getting Started: Setting Up Audio Recording in FL Studio
Before you can start recording in FL Studio, there are a few essential setup steps to ensure your audio interface and microphones are ready for use. First, connect your audio interface to your computer via USB. If you're using a microphone, make sure it's also connected to the interface, and that phantom power is enabled if you're using a condenser mic. FL Studio supports a variety of audio devices, so make sure yours is properly installed and recognized by your system.
Next, you need to configure the audio settings within FL Studio. Open the program, and navigate to Options > Audio Settings. Here, select your audio device from the dropdown menu. If you’re using an ASIO driver, it’s recommended for lower latency, which is crucial for real-time recording. Adjust the buffer length as needed; shorter lengths lead to lower latency but can increase the risk of audio dropouts, especially during complex projects.
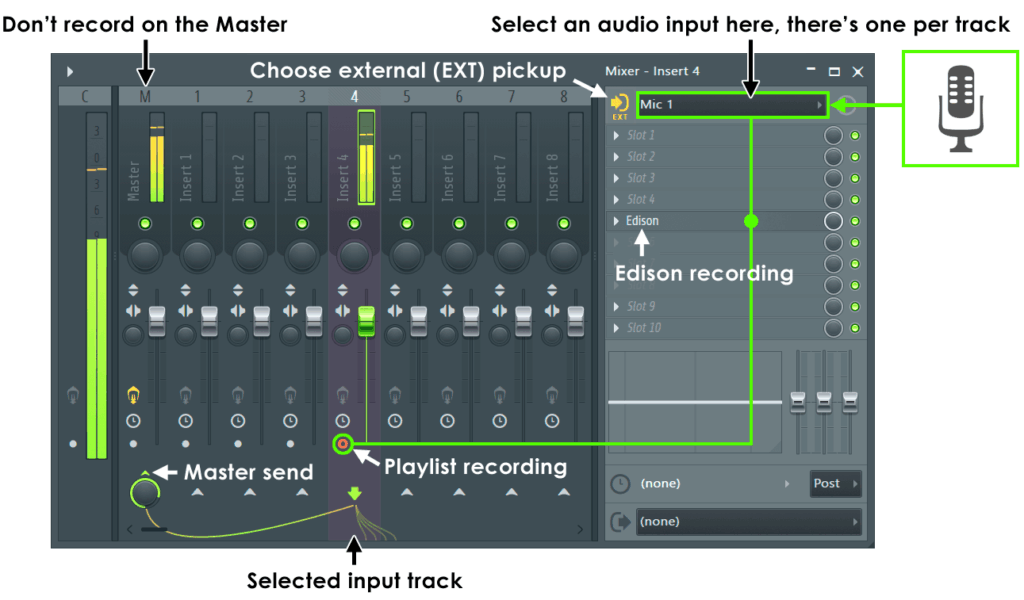
Finally, create a new project or open an existing one. Add a new audio track by selecting the ‘+’ icon in the Mixer. This will allow you to assign the track to your audio input. Make sure to enable the track for recording by clicking the record button (a circular icon) on the track in the Mixer. With these steps completed, you’re ready to start recording your audio!
Step-by-Step Guide to Record Audio Tracks in FL Studio
Once your audio settings are configured, it’s time to start recording. To begin, go to the Playlist window and locate the audio track where you want to record. Click the 'Record' button on the top toolbar, which will open a recording dialog box. Here, you can choose to record audio, automation, or notes. Select the option for audio. This dialog also allows you to set up monitoring, so you can hear what you're recording in real-time.
When everything is set, hit the ‘Play’ button to start recording. You’ll see the audio activity displayed on the track you’re recording to as you perform. It’s a good idea to do a sound check before recording your final take to ensure your levels are appropriate and you’re capturing the sound quality you desire. Keep an eye on the audio meters to avoid peaking, which can cause distortion.
After you've recorded your audio, you can edit it as needed. This includes trimming, fading, or applying effects. FL Studio provides a range of tools in the Playlist and Mixer to help you polish your recording. Once satisfied, you can save your project, export your audio, or continue building on your track. With practice, recording in FL Studio will become a seamless part of your music production process.
Recording audio in FL Studio is an essential skill that can enhance your music production and sound design projects. By properly setting up your audio environment and following the step-by-step guide, you'll be able to capture high-quality recordings that bring your creative ideas to life. Whether you're a novice just starting out or an experienced producer, mastering audio recording in FL Studio can significantly boost your workflow and help you craft professional-sounding tracks. So, gather your gear, follow the steps, and let your creativity flow!
Leave a Reply