
how to record vocals in fl studio
Recording vocals in FL Studio can be an exciting yet challenging endeavor for both beginners and seasoned musicians. Whether you're a singer, rapper, or voiceover artist, having the right setup and understanding the process can elevate your recordings significantly. This article will guide you through the essential gear you need and provide a step-by-step approach to achieving polished vocal tracks in FL Studio.
Essential Gear and Setup for Vocal Recording in FL Studio
To begin, having the right gear is crucial for capturing high-quality vocal recordings. A good microphone is the cornerstone of your setup; consider investing in a condenser mic, as they tend to capture vocals with more detail and warmth. Additionally, you'll need a microphone interface or an audio interface that converts the analog signal from your microphone into a digital format that FL Studio can understand. Look for an interface with phantom power capabilities if you choose a condenser microphone, as they require it to function.
Next, a pair of closed-back headphones is essential for monitoring your vocals while recording. Closed-back headphones will prevent sound from bleeding into your mic, ensuring that your recordings are clean and professional. Lastly, a pop filter can help minimize plosive sounds—like "p" and "b"—that can distort your recordings. Setting up in a quiet, acoustically treated space will further enhance the quality of your vocal tracks, reducing unwanted background noise and echo.
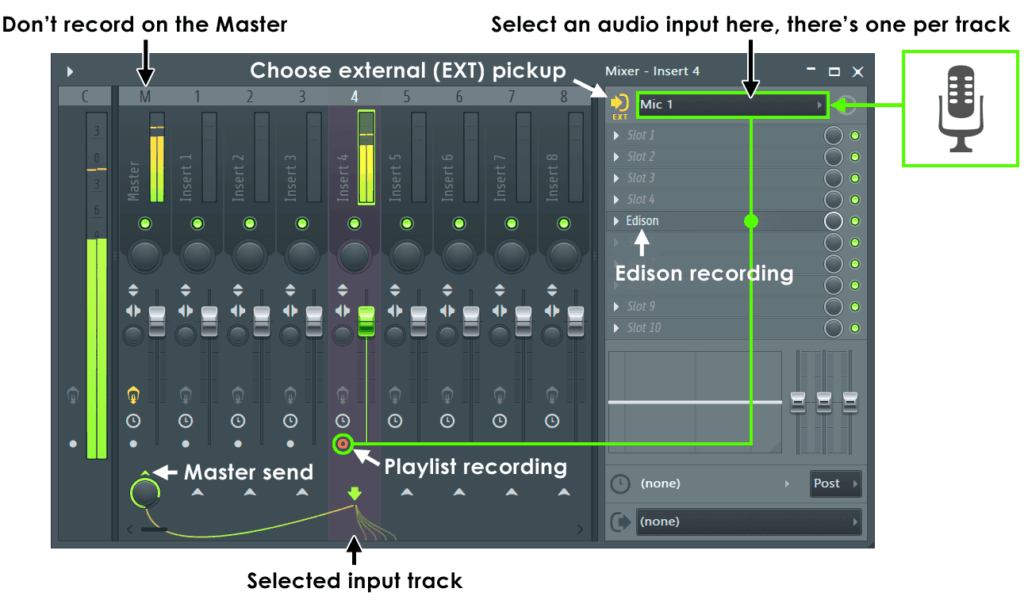
Once you have your gear ready, ensure that your workspace in FL Studio is optimized for vocal recording. Open a new project and set your audio interface as the input device in the audio settings. This step is crucial as it allows FL Studio to recognize your microphone. Additionally, create a new audio track where you will record your vocals, ensuring that the levels are properly adjusted to avoid clipping while maintaining a good signal strength.
Step-by-Step Guide to Recording Vocals Like a Pro
With your gear in place and your FL Studio workspace set up, it's time to dive into the recording process. Start by creating a new audio track within FL Studio. Arm this track for recording by clicking the record button on the track header. It's a good idea to add a metronome or guide track to help you stay on beat, especially if you're recording music with a tempo. You can also set a countdown before the recording begins to give yourself a moment to prepare.
Before hitting record, conduct a sound check. Speak or sing into the microphone while monitoring the input levels in FL Studio. Adjust the gain on your audio interface to ensure that your levels are peaking around -6 dB to -12 dB. This range provides a good balance, allowing you to capture the nuances of your voice without distortion. Once everything is set, hit the record button and start your performance. Remember, if you make a mistake, don’t hesitate to stop and redo the take; it's all part of the creative process.
After you finish recording, take some time to review your takes. Listen for any imperfections or areas that may need re-recording. Once you're satisfied, you can move on to the mixing stage. This involves adding effects like compression, reverb, or EQ to polish your vocals further. FL Studio offers a range of plugins that can help enhance your sound, giving your vocals the professional touch they need.
Recording vocals in FL Studio doesn't have to be an intimidating task. With the right gear, a well-structured setup, and a clear understanding of the recording process, you can create impressive vocal tracks that stand out. Whether you're laying down a demo or working on a final project, following the steps outlined in this article will help you achieve high-quality results. So, grab your microphone, get inspired, and start recording!
Leave a Reply