
how to replace recorded vocals while recording fl studio
In the world of music production, the ability to replace recorded vocals while recording can be a game-changer. Whether you're a seasoned producer or a budding artist, understanding how to efficiently swap out vocals in FL Studio can save you time and frustration. This guide will walk you through the steps required to achieve this and provide some tips to ensure a seamless process.
Step-by-Step Guide to Replacing Vocals in FL Studio
To start, open FL Studio and load your project. If you already have a vocal track recorded, locate it on the playlist. Right-click on the audio clip containing the vocals you wish to replace and select "Edit in audio editor." This will open the Edison audio editor, where you can listen to the original performance. For this step, ensure you have the original vocal track properly set up with the necessary effects and adjustments.
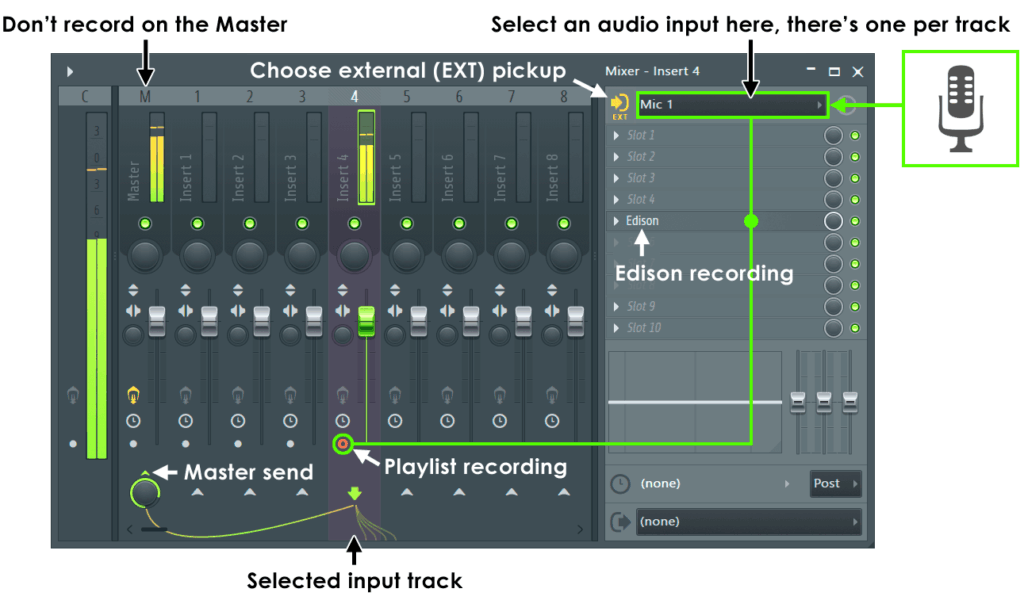
Next, prepare your new vocal takes. This can be done by recording them directly into the project or importing pre-recorded files. If you choose to record directly, make sure to enable the recording button on your desired mixer track. Always monitor the original track while recording to maintain the timing and flow. FL Studio provides options for monitoring inputs, which can be crucial in ensuring that your new vocal takes align perfectly with the existing project.
Once you’ve recorded your new vocals, it’s time to replace the original track. Simply drag your new vocal clip from the browser or the recording section onto the playlist, aligning it with the previous vocal track. You can then mute the original track or adjust its volume to zero to avoid any interference. After this, use automation clips, effects, or volume adjustments to blend the new vocals seamlessly into your mix.
Tips for Seamless Vocal Replacement While Recording
One of the most effective tips for seamless vocal replacement is to use headphones during the recording process. This minimizes bleed from the instrumental or backing tracks into the microphone, ensuring that the new vocals are clean and without unwanted noise. Additionally, adjusting the levels of your instrumental tracks can help create a balanced soundstage, making it easier for you to perform your new vocal takes confidently.
Another crucial tip is to utilize FL Studio's comping feature. This allows you to record multiple takes of your vocals and then select the best segments from each take to create a polished final version. To do this, simply record several takes on the same track, then use the slicing tool to cut out the best parts and arrange them into a cohesive performance. Comping not only saves time but also increases the chances of capturing the perfect vocal expression.
Lastly, don’t forget to monitor the pitch and timing of your new vocals. FL Studio offers tools like Pitcher and NewTone, which can assist in correcting any pitch discrepancies that may arise during recording. Similarly, the quantization feature can help align your new vocals with the beat more accurately. Always take the time to fine-tune these details, as they can significantly impact the overall quality of your track.
Replacing recorded vocals while recording in FL Studio can enhance your workflow and improve the quality of your music. By following the step-by-step guide and incorporating the tips provided, you can achieve a smoother, more effective vocal replacement process. Remember, practice makes perfect; the more you experiment with these techniques, the more adept you'll become at ensuring your vocal performances shine in your productions. Happy recording!
Leave a Reply